Tuesday 31 May 2016

KMart Hack - Gift

Good morning

Marelle here today to share a cute gift idea that can be created quickly and cheaply!

Following on from the amazing Lisa Oxley's Kmart hacks, I purchased this $2.00 "LOVE" wall hanging from Kmart and gessoed it with Dina Wakley Gesso from the shop.

Next I took some Tattered Angels Glimmer Glaze - colour Purple Passion oh wow amazing product! I painted the love with this once the gesso was dry. While this was still wet, I sprinkled this amazing Prima Finnabair Sterling Glitter Glass over the top!

Once this was dry, I added some flowers and small embellishments from my stash and finished with a bow from Crochet Cotton!

This was a gift for a small little lady for her bedroom and she loved it!

I would love to see if you have recreated any Kmart Hacks lately!  I will give you a RAK from my stash if you upload on our Scrappingclearly Community page on Facebook!


 - 


Have a great day - I look forward to seeing your Kmart hacks!!

Love
Marellexxx


Saturday 28 May 2016

Happy Boy layout by Tania

Hello again Scrappingclearly fans! I am feeling a bit proud of myself!!! Why you all ask??? Well, I scrapped a boy layout...yay!!! Now, it's not that I've never done it before, I have a very beautiful scrapworthy 10 yr old boy!!! I just don't seem to find it as easy as scrapping all the pretty stuff for a girl layout! Soooo, when my amazing Design Team kit arrived from Kylie, I challenged myself to pick out some bits first up and scrap a male layout!!! So, I'm feeling happy with my "HAPPY BOY" layout!!!! I used the gorgeous papers from Crate Paper- Maggie holmes, BLOOM collection! Gosh so many to choose from. They are all double sided, so went with the blues and greens and black and white!


On my cardstock I used some Heidi Swapp colorshine in navy, through a Heidi Swapp stencil, and flicked a few drops randomly on there too. I layered my papers and needed something a little brighter for my photo mat, so I found a piece of Teresa Collins Life Emporium paper which was perfect! (and it's on special I might add!) The Moments paper from the BLOOM collection was perfect to add a little typewriter font randomly around my layout.


There are some gorgeous washi tape stickers in the BLOOM collection, I made a small banner and used one to anchor part of my title! (Which by the way is made up of a die cut, Heidi Swapp word and some chipboard alphas from We R Memory Keepers.


Finally, I think the little rubber shapes from the BLOOM collection are adorable, (love you & happy), I have a few more in girly colours to play with, so watch this space!!!!
Thanks for looking, you never know you might just see some more boyish layouts from me soon!!!
Tania

Friday 27 May 2016

Brown and Bunnies

 Howdy Folks, Lisa Here with a Friday Blog Update.
I was lucky enough to spend time with gorgeous DT member Peg
 in her part of town, at a charity Retreat in Uralla .
Lucky Peg had a DT pack of goodies from Kylie , 
and while she was peaking through the box of pattern papers,
I off handledly remarked that she could scrap with absolutely any paper and make it work. Well,lookie what she come upon through the hunt..
Brown paper with Bunnies on it.
hmmmmmmmm, seems it was my challenge after all.
So I hit it with some Gesso, Black House Paint and 
some random stamping in black Stazon .

Added my usual scrappy additions to the layout..
Doodling , Muslin ,Tissue Paper ,more stamping .
some material , Blossoms , Heidi Swapp Acetate hearts ,
 Thanks for dropping by folks, see you next week.

Thursday 26 May 2016

Life At 14 - With Karyn!

Hi Scrapping Clearly Lovelies!!! 

It's Karyn here and today I have a scrapbook page to share made using lots of new products from Scrapping Clearly
The photo is of my daughter and I wanted to capture her likes and interests at 14!
I wanted to feature some of the new Minc ombre foil on my page (the blue and silver one) so I printed a digi (the "XO" cut file from The Cut Shoppe) onto some cardstock using my laser printer then I added the foil and ran it through a laminator. I have a 6" minc that I use for smaller items but I use a laminator for A4 size. The Minc is definately a better tool for the job and I would recommend the 12" one if you can afford it and if you would use the larger pages. I only have an A4 laser printer so I need to cut down my cardstock to fit - but you can always design your pages around this.

Unfortunately foiled pages/elements are very difficult to photograph - especially at night (like I had to do for this project), so it is very hard to see in these photos. You can see the ombre pattern a bit in the next photo - it is silver in the middle of the page and teal along the top and bottom.    
I added some strips of the Pebbles "Spring Fling" paper collection along the side of my Minc'd page then I matted my photo with a paper doilie more Pebbles papers. The Dear Lizzy foam glitter thickers add more bling and are a perfect complement for this page. 
One of the Pebbles papers had a heap of square/rectangle elements perfect for cutting up and using on your page - I made this one a feature. I've added a tag behind my photo where I've documented Rachael's interests and likes at "14" - it is nice to keep this more personal information hidden. 

In the bottom corner I've added some paper strips and punches, a Pink Paislee puffy sticker and some sequins - more bling!!  
Scrapping Clearly products I've used include

Pebbles "Spring Fling" paper collection 
Heidi Swapp minc reactive foil - ombre teal and silver 
Pink Paislee "C'est la Vie" puffy stickers   
Pink Paislee "C'est la Vie" paper clips
Dear Lizzy foam glitter thickers 
Teresa Collins "Save The Date" sequins

I print my photos on an Epson XP-600 printer

Thanks so much for stopping by

Crafty Hugs xx
Karyn

Wednesday 25 May 2016

Heidi Swapp " Hello Gorgeous" papers..

Hellooo..

Bernii Miller here today for your Hump Day scrapbooking fix :) 

I was lucky enough to be sent the STUNNING  Heidi Swapp " Hello Gorgeous" 12 x 12 papers which I was totally swooning over as soon as I opened my goodies..


I created the title with the Cocoa Vanilla studio " Life is Beautiful" alphabet stickers.. They match perfectly with the Heidi Swapp papers.. 

 I found this quote scrolling through pinterest feed the other day and it is perfect for me right now in my life.. I love being able to mix my title size and the Cocoa Vanilla sticker sheet was perfect!! 


I fussy cut the black and white flowers, and used the grey triangle paper as my guide too cutting and lining up the other pieces to create the triangle background. Super easy to do and I love how it turned out. 


Thanks so much for stopping by today and I hope I have inspired you a little today to create...

You can find more Heidi Swapp products HERE in the store...

Till next time much love
Bernii xx


Tuesday 24 May 2016

Planner catch up - by Chloe

Hello there!  I haven't posted a planner update for a while, so I still have April to share with you :)
If you are interested, here is my other planner posts:
January
February
March


I went all pretty for April :)


I created another shaker pocket ... cos they look so cool!


Here's the calendar page:

And a close up of the Rainbow Splendour wood veneer pretty pin I coloured with a metallic marker ...


Here is an example of what my days pages look like .. nothing too fancy really - maybe just a few stickers and washi tape for colour :)


That's April done!  Happy scrapping ;)

Products from the store:
Heidi Swapp Personal Size Memory Planner Gold Striped
Heidi Swapp Memory Planner Puffy Heart Stickers
Heidi Swapp Paper Clips Pink
Scrappingclearly Planner kits
Heidi Swapp Memory Planner Foil Cards

Monday 23 May 2016

Dear Lizzy Love by Lauren Hender

When I saw the new Dear Lizzy range I knew I had to have it! Check out this beautiful paper below... isn't it fabulous. So fabulous that my little girl had to be on it.

A tip when using busy background paper have a photo that stands out. Most of the time I use a black and white photo but on this layout I thought the colour tones of this photo matched perfectly.


Manor House make beautiful mesh/lace flowers. I loved the colour pink of one of the flowers and so operation pull apart commenced making a beautiful edge to help define the photo.


And my last tip is don't be frightened to freestyle and add a little extra to the background. Here I added some squiggles and with a glitter pen and white paint pen. 

Be Brave and create!
Lauren xx 

The Dress by Melinda

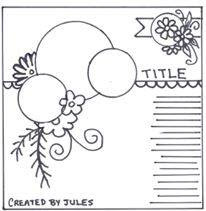
Hi there and welcome! Melinda here with you today sharing another page I put together using the gorgeous Simple Stories Life In Color range this time for May's fun sketch challenge!

Here is a little refresher of the sketch and you have until the end of the month to get your page linked up!


This page is, again, different for me but I am really happy with how it turned out and all of that white space!


I started this page off with this awesome glitter bead paste from my stash - Kylie has a similar one in store here but if anyone is keen on the actual one I used (it has glitter in it!) Kylie has said she can look at stocking it!!


While that was air drying I started to pick my embellishments. Today I chose to pull out the pinks and yellows from the collection and go with those as I had already decided to go with a white card stock base! And a doily from my stash. 


I have used pieces from the sticker package, the chipboard stickers, some of the pieces from the bits and pieces pack, some of the stickers from the sticker sheet in the collection pack and also some of the clear stickers (with the silver and black). I used a few scraps (I am running very low on this range now!!) to back my photo with some of the yellow and pink behind the doily.


I'm not sure why that "TUES" sticker has photographed pink, it is actually silver (you can see it better in the previous and next photo's)!


A different angle of the same cluster so you can get a better look at that beaded gel paste! 


And a photo of the top cluster on the right :) I have layered one of the pink washi strips (which I cut into a fish tail), the beaded glitter paste and then some stickers, bits and pieces and a chipboard flower.


Finally, onto the title which I used a combination of the tile alphas from the collection pack and these thickers by Dear Lizzy, they are just gorgeous!! I finished it off with another of those clear stickers with black hearts.


So, that's it for this post! Make sure you link up your take on this fun sketch by the end of the month for your chance to win!

Melinda


Sunday 22 May 2016

Colour Blast Meets Dylusions

 G'day Arty Peeps
Peg here to share a page done with fabulous supplies from Scrapping Clearly.
These pics were taken during a family holiday to Tasmania last year,
so much fun!

Starting with white cardstock I applied Colour Blast paste in Dusty Charcoal through a text stencil. Then added some colours with Ranger Dylusions sprays.


I highlighted my middle photo, in a series of three, using a Heidi Swapp ghost frame attached with brads, and added a strip of the divine Hambly mini graph transparency to ground the set.

The title was done with Scrapmatts banner letters and a Heidi Swapp word sticker from the Christmas set, don't you love that font!

So that's my page.
Thanks for coming by

Thursday 19 May 2016

{Friday Creating with Kylie}

Morning everyone - today I am sharing the latest pages I have created in a members journal who is participating in Scrappingclearly's Circle Journal Group for 2016. I am having so much fun participating in this CJ Group all the members work is totally inspiring and soooo amazing.

The Theme for this particular Journal is "Queenism" I totally love the theme......


The Journals in the group have been constructed with paper bags so first up I used gesso to prime the pages once dry I then painted with Dylusions Cherry Pie.

For some dimension I used a stencil with some Color Blast Color Paste - Lipstick on sections of both pages, once dry I then rubbed some Inka Gold onto the stencil pattern.


To create some extra depth I drew with a Red Gelato around the outside edges of the pages - using a water brush I blended the gelato.

To add my "Queenism" touch I found my image and quote and the inspiration for the journal - I printed and cut the image and adhered and sealed down to my page with gel medium, once dry I added some kind glitz and red lipstick with a gel pen, the glitter crown was a great embellishment.


To journal my quote I used Fundamentals Alphabet Stickers, Thickers and Fundamentals Wood Veener Alphas.


For extra touch I have added some washi, lace and arrows I have also used my trusty Fudeball pen to frame the pages. I found some cute charms so I have attached with some bakers twine.


This Circle Journal is no ready to take the next step of it's journey......


Thanks for stopping by have a great weekend!


Hello Gorgeous Cards with Cork by Tania

Hi everyone! Today I've made a cute set of cards with the Heidi Swapp HELLO GORGEOUS papers. These have been such a pleasure to work with, so versatile!!! For something a little different, I thought I would incorporate these cute Cork pieces from Teresa Collins' Life Emporium range. (There are over 20 pieces in the pack!)

I'm being very frugal with these papers and using every last morsel! The black floral strip is the cut off strip from one of the papers. I made it stretch to all 3 cards, even made a tab out of it with my tab punch.


On this card, I used a yellow Gelato crayon & a water brush to add some colour to the flowers. I've backed the cork embellishment with some of the patterned paper scraps to highlight it!

My sentiments all came from a cute Alphabet Sticker pack from Prima. The ribbon you see is cut from those lovely Kaisercraft Ribbon Roses, which I am getting very good mileage out of!!

To finish off the cards, I added a few gold sequins!!! Hope you like them and I have inspired you to make some cards today!!! Happy Crafting!!!

Wednesday 18 May 2016

Sweet Hello - with Karyn!

Hi Scrapping Clearly Lovelies!!! 

It's Karyn here today with a scrapbook page to share with you made using lots of Scrapping Clearly goodies. 

The May monthly challenge over on the Scrapping Clearly blog is a sketch challenge - you should give it a go and be in the running to win some scrappy goodies!! 

I've used this sketch as inspiration for today's scrapbook page (just flipped a bit) - made using lots of goodies from Scrapping Clearly of course.
For this project I've used the Cocoa Vanilla Studio "Hello Lovely" collection. I love all of the collections from Cocoa Vanilla Studio - and I love that it is an Australian business! 

An advantage of using elements from a collection is that everything coordinates which makes decision making easy. Here I've used papers, ephemera, enamel dots, wood veneer and flair.    
I've added a large paper doilie under my photo as a mat - I love the soft look that a doilie provides! I've clustered ephemera, and other embellishments around my photo. 
I love that the sketch has a journalling strip direct on the page. 
I've used some of the words in the CVS ephemera packet as my title - and isnt this flair gorgeous! 
Why dont you give the sketch challenge a go, and check out all the gorgeous Cocoa Vanilla Studio products available in the Scrapping Clearly store :) 

Scrapping Clearly products I've used include

Cocoa Vanilla Studio: Papers, enamel dots, flair, wood veneer and ephemera    
 
Thanks so much for stopping by

Crafty Hugs xx
Karyn